
How to Prevent Frozen Pipes in Cambridge Winters
Cambridge winters bring beautiful snowy days—but also freezing temperatures that can wreak havoc on your plumbing. Every year, countless homeowners face the nightmare of frozen pipes, which can burst and cause catastrophic water damage.
When water freezes inside a pipe, it expands, building pressure that can split even strong materials like copper or PEX. The result? Flooding, property damage, and expensive repairs.
Fortunately, frozen pipes are completely preventable with the right preparation. In this guide, we’ll explain why pipes freeze, how to prevent it, and what to do if it happens—so you can protect your home before the next cold snap hits.
1. Why Do Pipes Freeze?
When temperatures fall below -6°C, water inside your plumbing begins to freeze. As ice forms, it expands and pushes against the pipe walls. If the pressure becomes too great, the pipe can rupture.
Common locations for frozen pipes:
- Exterior walls without sufficient insulation
- Unheated basements, crawl spaces, and attics
- Pipes near windows or vents with cold air leaks
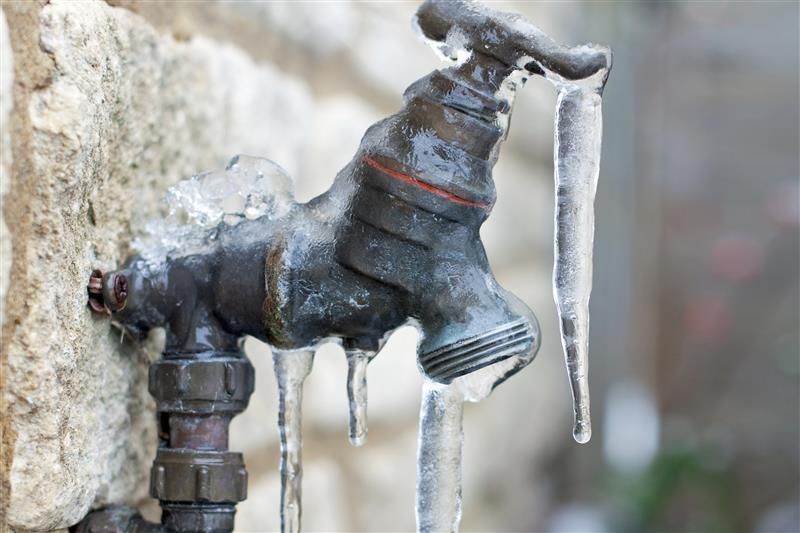
- Outdoor hose connections and spigots
Even a small frozen section can block the flow of water through the rest of the system, leaving you with little or no water from your taps.
2. Signs Your Pipes May Be Frozen
Detecting frozen pipes early can help prevent a burst. Here are some key warning signs:
- Reduced or no water flow: If your taps barely drip or stop entirely, ice may be blocking the line.
- Visible frost or ice on pipes: Frost buildup on exposed metal pipes is a clear warning.
- Bulging or deformed pipes: Expanding ice inside can cause pipes to swell.
- Unusual sounds: Clanging, banging, or “popping” noises in the walls may indicate freezing.
- Damp drywall or flooring: If a pipe has already burst, you may notice moisture or water stains.
If you notice any of these, act immediately—every minute counts when pipes are freezing.
3. How to Prevent Frozen Pipes
Prevention is always easier and cheaper than dealing with a burst pipe. Follow these steps to keep your plumbing system safe during the winter months:
1. Insulate Exposed Pipes
Wrap pipes in foam insulation sleeves or use heat tape for added protection. Focus on areas like basements, attics, crawl spaces, and garages.
2. Seal Drafts and Cracks
Cold air can enter through gaps around windows, doors, and vents. Use caulking or spray foam to seal leaks near plumbing lines.
3. Keep the Heat On
Even when you’re away from home, maintain a minimum indoor temperature of 13°C (55°F). It’s far cheaper to heat your home than to repair water damage.
4. Let Faucets Drip
During extreme cold, allow faucets—especially those on exterior walls—to drip slowly. The continuous movement of water makes it harder for pipes to freeze.
5. Open Cabinet Doors
In kitchens or bathrooms with pipes along exterior walls, open cabinet doors to allow warm air to circulate around the plumbing.
6. Disconnect and Drain Outdoor Hoses
Leaving hoses attached traps water in the faucet and connected line, which can freeze and crack. Drain all hoses and store them indoors.
7. Install Frost-Free Hose Bibbs
If you’re replacing your exterior spigots, consider frost-free models. These extend the shut-off point deeper into the warm part of your home, greatly reducing freeze risk.
4. What to Do If a Pipe Freezes
Even with precautions, extreme cold can sometimes win. Here’s what to do if you suspect a pipe has frozen:
Step 1: Turn Off the Water Supply
Immediately shut off the main water valve to reduce pressure in the system. This minimizes flooding if the pipe bursts while thawing.
Step 2: Open the Affected Faucet
Turn on the faucet connected to the frozen pipe. This relieves pressure and allows melting water to flow freely once the ice thaws.
Step 3: Apply Gentle Heat
Use a hair dryer, heating pad, or space heater to warm the frozen section gradually. Move the heat source evenly along the pipe—never use an open flame.
Step 4: Check for Leaks Once Thawed
After restoring water flow, inspect the area for leaks. A frozen pipe may have cracked without bursting immediately.
Step 5: Call a Professional Plumber
If you can’t locate the frozen area, or if the pipe is behind walls or ceilings, contact a licensed plumber right away. They have specialized tools, like pipe thawing machines, to safely restore flow.
5. The Cost of Frozen Pipe Damage
A single burst pipe can release hundreds of gallons of water in just a few hours. The resulting damage can include:
- Destroyed drywall, insulation, and flooring
- Mold growth within 48 hours
- Electrical hazards
- Expensive restoration bills (often exceeding $10,000)
That’s why proactive prevention is always the smarter choice.
6. Professional Solutions for Long-Term Protection
Reliant Plumbing offers several services to help Cambridge homeowners prevent frozen pipe disasters:
- Comprehensive winterization for plumbing systems
- Insulation and heat tracing installation
- Exterior faucet upgrades
- Leak and pressure testing to detect weak points
Our licensed technicians ensure your plumbing is prepared for the harsh Ontario winter—so you can focus on staying warm, not drying out flooded floors.
Final Thoughts
Frozen pipes are one of the most stressful winter plumbing emergencies, but they’re also one of the most preventable. With proper insulation, steady indoor temperatures, and a few smart habits, you can avoid costly damage and keep your water flowing all season long.